Tuesday, 28 June 2011

Roosting Bars in the Chicken Run

Who is that tall rooster inside the chicken run? Well, that tall and handsome rooster happens to be my DH Brad.
My DH likes cutting up the vegetables before giving it to the chickens. He feeds them with vegetables from our garden.

Brad going inside the chicken run with more greens for the chickens. The chickens go crazy whenever they see him coming. 


Oops sorry! I could not find the key so you'll have to stay locked up with the chickens in the run for the day!

Providing some roosting bars in the run gives more space to the chickens. We made a crude ladder for them as they were still too young to fly up to the roosting bars and they used this ladder a lot. We also provided several roosting bars in the chicken run from the left over trunk of the trees that we cut around the property and they use all of them. They would jump from one roost bar to the other and try to catch anything that is flying around in the run. The runt among the group always manages to find the smallest space to squeeze itself out.

We put a potted plant inside the run and they demolished the leaves in no time. So my DH provides them with some grass or vegetables from our garden and feeds it to them. Since the chickens are still young, he cuts up the greens so they could eat these better. We started giving them greens at a very early stage as soon as they started eating their mother's food which is why they are so used to having greens now.


Monday, 27 June 2011

The Chicken Run in the Backyard


The first picture at the top is called the chicken run. My nephews cut up some trees around our property and they used these as posts to hold the wire mesh that enclosed the entire chicken run. This was their project during their semestral break this summer. We used a green netting on the roof to deter the hawks and the many house birds in our place from going inside the chicken run. Once again, using some small pieces of scrap GI sheet materials, my nephews joined these together using a riveter and placed this material to cover the bottom part of the chicken run. The reason for this is that even if the chickens will be scratching in the run, the river sand will stay inside the run.

The second picture in the center shows the pop door in its open position. Since the location of the chicken run is higher than the chicken coop, we had to make a two-step stairs for the chickens when they go into the run. The river sand in the run will not go inside the chicken coop because we placed a stack of wood that surrounds the stairs to hold the river sand in place. My nephews also made some outside roosts in the chicken run and the chickens just love hanging out there during the day.

The last picture at the bottom shows the chickens taking a sand bath. This is how they get rid of any ticks and lice in their bodies.

Sunday, 26 June 2011

Cleaning and Gathering Eggs in the Coop

1

2

3

4

5

In picture number 1, it shows our access area to the sleeping quarters of the chickens with the red painted double doors and this is located at the back of the chicken coop. We used scrap GI flat sheet materials for the double doors and at the top part, we used wire mesh materials. Chickens make a lot of poop at night while they are roosting and the wire mesh at the top part of the doors serves as additional ventilation for the area. In this way, the chickens need not have to suffer the smell of their own poop while they are cooped for the night.

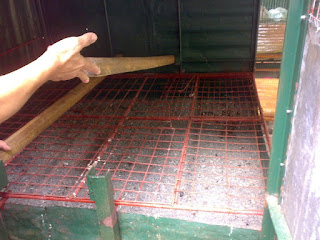
In picture number 2 with one door open, it shows the roosting bars and 6 inches below this is a welded wire floor made from scrap shelving materials. We had these wire shelves for a long time and we flattened these out and welded them together to make a welded screen floor. Under this welded wire floor is a green box which is about 8 inches high that is made out of scrap GI sheet materials. We joined the small pieces of scrap materials with a rivet to hold them together until we made a big box and then painted it green. Inside this green box is river sand, about 4 inches high. The chicken poop falls through this welded wire floor easily because the holes are big enough, about 1-2 inches wide in diameter and they need not step on their own poop when they get down from the roosting bars.  

Picture number 3. Chickens are said to fight over the highest place in the roost so we laid the two wooden roosting bars all on the same level. This access door actually serves with a dual purpose. One is for cleaning the chicken poop and second is for gathering the eggs. As you can see in the picture, it is easy to just reach inside the nest box to gather the eggs without having to go inside the chicken coop.

In picture 4 and 5, it shows the detachable roosting bars. We first remove the wooden roost bars and then lift up the welded wire floor and hook it up with a cable on the ceiling to hold it up. Then we use a screen ladle to scoop up the chicken poop that are on top of the river sand which is inside the green box. The chicken poop is then put inside a covered plastic container and then this is brought to the big garden which is at some distance to our house for the compost. Cleaning the coop is easy and there is no smell in the chicken coop.

Saturday, 25 June 2011

Inside the Chicken Coop


This is what it looks like inside the chicken coop. The picture on the top left shows the stairs that the chickens use to go to their sleeping quarters above which is 4 feet high. Just below their sleeping quarters is where they have their nest boxes. We placed three plastic nest boxes inside so they can chose which one they like to use best. The nest boxes were placed at about  two and a half feet high from the concrete floor. We use rice hull as litter material which is about six inches high over the concrete floor. So the actual height of the nest boxes from the surface of the litter is only two feet high. We just cleaned out the litter on the floor when these pictures were taken. We placed a piece of wood in front of the nest boxes and this serves as a landing area when they want to go into their nest. 

The picture on the top right shows the bottom of the stairs and beside it is the pop door that leads to the chicken run. This door is always kept open throughout the day so the chickens can come and go as they please. They always like hanging outside in the chicken run anyway except when it is raining. Whenever we give them some vegetables, the first one to grab a piece would run like hell with it and goes inside the chicken coop and the rest would follow and chase her until she drops it. It's really fun just watching them doing their own antics. 

The last picture at the bottom shows the pop door in its closed position. We close this door at night when all the chickens are inside to protect them from night time predators. We do have a cat in the neighborhood that comes into our yard at night and we do not want him smelling the chickens. On the opposite side of the pop door (not seen in pic) is a PVC pipe that we cut in half and this serves as their feeding trough. We make sure that we do not give them more than what they could finish for the night so there is no left over foods on the feeding trough. The waterer inside the coop is a 1.5- litter plastic soda bottle with a nozzle attached to the mouth. The chickens drink from this bottle by pecking at the nozzle and it releases the water.  

Friday, 24 June 2011

The Chicken Coop in the Backyard


This is the chicken coop with the red door on the left side of the rabbitry. The floor area is 6 feet wide by 10 feet long by 7 feet tall. This gives me a total floor area of 60 square feet inside the chicken coop which is good for 10 medium sized chickens. The recommended floor space per chicken of medium breed is 8-10 square feet of space inside the coop, if the chickens are to be confined for long periods of time. Since I only have 1 native hen of medium size and 5 young native pullets that are even smaller, the space inside the chicken coop is more than enough for them. The front of the chicken coop and its right side wall facing the rabbit's side is enclosed with a wire mesh. So there is a free flow of air inside the whole building from the rabbitry to the chicken coop side. Since this is the onset of the rainys season here in the Philippines, we will have to cover the front wall of the chicken coop with clear plastic material so the rain water will not go inside. There is still a free flow for air circulation inside because part of the wall on the left side of the coop is also covered with wire mesh material.


Thursday, 23 June 2011

The Rabbits


These are my breeding stocks. I lost a female New Zealand doe with the red eyes just 3 days ago for some unknown reason. That's her in the picture at the top with the red eyes. She was doing okay the night before but the next morning, she was looking lethargic and would not eat anything. We brought her inside the house and tried to give her some water and tempted her to eat some carrots but she still would not eat. I was going to bring her to the clinic that morning but was told that the vet won't be in until 2 in the afternoon. We called another vet listed in the telephone directory but unfortunately, he was also on field. So we asked if he could drop by our house to check on our sick rabbit, that was 11 AM. By around lunchtime, that rabbit passed away, just like that! I felt so devastated because I could not find anything wrong with her and I felt helpless not knowing what to do because it happened so fast.

 So now, I have only three does left, one New Zealand mixed breed and one Cinnamon mixed breed and one Chinchilla mixed breed. The spotted white and brown buck is a mixed breed of Chinchilla and Cinnamon, he was born on December  15, 2011. The black buck is a mixed breed of New Zealand and Chinchilla breed, he was born on January 02, 2011, barely 6 months old. Baguio City's elevation is at 5,000 feet above sea level and it is usually cool up here but lately, the weather during this summer has been hot. So what we do to make the rabbits feel more comfortable is to give them some iced water bottles. We fill up several 1-litter plastic soda bottles with tap water and freeze them at night. In the mornings, we give these frozen bottles to the rabbits. They would stretch out on their full length on the wire floor and lie down right next to the frozen bottles to keep themselves cool.  They usually spend a lot of time sleeping during the daytime but they are active during the late afternoon when it's almost supper time. We give them more greens and feeds at night because that's when they like to stay up and just keep on eating.

Wednesday, 22 June 2011

The Rabbitry


We re-purposed the old pigsty in the backyard to become a tiny house for our rabbits and chickens. The top picture is now the rabbitry part and it houses 2 bucks and 3 does, these are my breeding stocks. We kept a lot of  scrap GI sheet materials in the old run-down pigsty knowing that these may come in handy someday. I'm glad that we didn't throw these away because we used them all up in building the rabbit hutches.

We made a two-tier steel frame rabbit hutch with two hanging cages on each level. The bottom picture shows the steel frame inside the doorway. Under the cages on each level, we made a slanted floor made out of scrap GI sheet materials and then  covered these with cheap linoleum. The bottom of the slanted floor has a pvc pipe that was cut in half and this serves as a gutter. The wastes and urine that falls down on the slanted floor goes to this gutter and then it goes to a bucket with a strainer. This strainer serves as a screen to separate the urine from the wastes materials. The urine drains into a pvc pipe that goes into the creek and this leaves the wastes behind which is then taken out and put in a closed bin with earthworms on it.

All of our 4 cages are made of all-wire welded wire mesh material. The size of each breeding cage is 2.5 feet wide by 3 feet long by 18 inches tall. Based on the numerous research that I've done on the internet, this is the ideal space for a medium sized breeding doe and her litters as it can accomodate a nest box. Since I have only four cages at the moment, I placed 2 rabbits in each cage. When I bought them, they were only 2 months old and I thought it would make them feel better if they had company. I will be separating each of them soon after we finish making the rest of the cages. I plan to start breeding them by mid July as they will be 18 weeks by then.